
Home | Thur, 8July | Fri, 9July | Sat, 10July
Red = changes from last year |
Green = important for 1st year AP teachers |
Blue = activities for workshop participants |
Orange = personal perspectives by workshop leader |
Morning Session I : Lessons 6 & 7 [9:30-11:00am]
Recap and Reflection of Lessons - Jeannie
Lesson 1 - Intro to Java and JavaScript
Lesson 2 - Variables and Data
Lesson 3 - Functions and Methods
Lesson 4 - Program Flow
Lesson 5 - standard Java API and JavaScript DOM
Lesson 6 - Strings, Arrays, and JavaScript objects and expressions L84-L93 - Jeannie
-
Stage 1: Plan - http://mathstretch.com/js/Lesson6.html
Stage 2: Teach
Anticipatory Set
-
Modeling
-
Activity 1 -
-
-
Checking for Understanding
-
Guided Practice
Stage 3: Assess
Assessments
Independent Practice
Stage 4: Act - Supplemental Resources
Lesson 7 - create a program using custom JavaScript objects (with database type functionality) L94-L99 - Jeannie
-
Stage 1: Plan http://mathstretch.com/js/Lesson7.html
Stage 2: Teach
Anticipatory Set
-
Modeling
-
Activity 1 -
-
-
Checking for Understanding
-
Guided Practice
Stage 3: Assess
Assessments
Independent Practice
Stage 4: Act - Supplemental Resources
Morning Session II : Lessons 7 continued [11:15-1:00pm]
...see Morning Session I
Afternoon Session I : Lessons 8 & 9 [2:00 - 3:30pm]
Lesson 8 - Debugging Techniques L100-L118 - John
-
Stage 1: Plan - 3 types of errors: Syntax, Runtime, and Logic
Stage 2: Teach
-
Anticipatory Set - program developers are expected to deliver fully debugged and tested code
-
Modeling - HTML
<!doctype html>
<html lang="en">
<head>
<meta charset="utf-8"><title>Lesson 8 - Debugging JavaScript using the Developers Tools in a browser</title>
<script src="lesson8Debug.js"></script>
</head>
<body>
<p>Lesson 8 - Debugging JavaScript using the Developers Tools in a browser </p>
<p><input type="button" onClick="swapImages()" value=" Swap/Rotate">Click to Swap or Rotate Images</input></p>
<img src="0.gif" id="AceClubs">
<p id="slot0">Ace of Clubs </p>
<img src="1.gif" id="twoClubs">
<p id="slot1">Two of Clubs </p>
<img src="2.gif" id="threeClubs">
<p id="slot2">Three of Clubs </p>
</body>
</html>
-
Modeling - JavaScript
// Lesson 8 Debugging JavaScript
// Good programming practice includes following strict programming guidelines
// "use strict" also helps find Syntax Errors that would otherwise fail silently
"use strict"function swapImages() {
// No errors to get the first image from the DOM
var firstImage = window.document.getElementById("AceClubs");
console.log(firstImage);
/* Error Type 1: JavaScript SYNTAX ERROR, forgetting an assignment (=).
* Console error message will "assume" that there is a missing semicolon (;)
* after declaration of the secondImage variable.
* DEBUG BY COMMENTING OUT THE NEXT LINE
*/
var secondImage window.document.getElementById("twoClubs");
// Error Type 1: Correct Syntax
var secondImage = window.document.getElementById("twoClubs");
/* Error Type 2: JavaScript RUNTIME ERROR, misspelling a function name.
* May generate a Console Error for a generic "TypeError"
* May generate a Debugger Error where an Exception variable can be inspected.
* Often caused by trying to access an object (method/property)
* that does not exist in the DOM.
* DEBUG BY COMMENTING OUT THE NEXT 2 LINES
*/
alert("the next line has a Runtime Error");
var thirdImage = window.document.getElementByID("threeClubs");
// Error Type 2: Correct RunTime method call
var thirdImage = window.document.getElementById("threeClubs");
/* Error Type 3: JavaScript LOGIC ERROR, not swapping the intended images.
* No Console messages but the X/HTML does not display
* swapped/rotated images as expected. Instead, it duplicates
* one of the images.
* DEBUG BY COMMENTING OUT THE NEXT 3 LINES
*/
firstImage.src = secondImage.src;
secondImage.src = thirdImage.src
thirdImage.src = firstImage.src;
// Error Type 3: Correct logic to swap to rotate the images
var temp = firstImage.src;
firstImage.src = secondImage.src;
secondImage.src = thirdImage.src
thirdImage.src = temp;
}
/** The following code is an older approach to debugging scripts prior to the
* Developers Tools in browsers. It will not catch Syntax Errors but can
* detect many Runtime Errors.
*/
/*
window.onerror = function (msg, url, line) {
alert("ERROR: " +msg + "\n" + url + "\n" + "line: " + line);
return true;
}
*/
-
Checking for Understanding
-
Guided Practice - identify and correct each of 3 types of errors using Developer's Tools: Lesson8Debug.htm, lesson8Debug.js, 0.gif, 1.gif, 2.gif
Stage 3: Assess
-
Assessments - L115-117 may be more challenging for students to answer.
-
Independent Practice - L113-114 (student page 54) - have students swap the labels of the images so that they correspond with the swapped images...see lesson8Solutions.js
Stage 4: Act - Supplemental Resources
-
Lesson 9 - Programs involving multiple interactive Java classes and developing JavaScript interactive forms L119-L136 - John
-
Stage 1: Plan -
-
This Lesson starts with minimal HTML and complete JavaScript code that the teacher can simply assign students to copy or as a reference for more complex assignments/projects.
-
Bottom-up Design (10 ft view, 100ft, and 1,000 ft views) starts with a modification to the DOM by creating a simple form element and one button. More functional and flexible DOM modifications are made during the 2nd step. The 3rd and final step ends with abstracted methods using parameters to complete the complex DOM modification.
Part 1 has one HTML file and a sequence of three JavaScript files.
- Lesson9Part1.htm with lesson9Part1SeqA.js - dynamically create a form element with one button
- Lesson9Part1.htm with lesson9Part1SeqB.js - create a radio button, text area, and button using 3 methods
- Lesson9Part1.htm with lesson9Part1SeqC.js - general methods to create different form elements including selection lists (abstraction)
Part 2 has only one HTML file and one JavaScript file
- Lesson9Part2.htm with lesson9Part2.js - algorithms & data structures (selection sort & Arrays)
Stage 2: Teach
-
Anticipatory Set - it is important to demonstrate to students that the Lesson9 Part 1 HTML files initially have NO FORMS or FORM ELEMENTS. However, Part 2 focuses on SORTING of pre-filled array of form elements.
Initial Lesson 9 Part 1 HTML file...no Forms
<!-- <!doctype html> <html lang="en"> <head> <meta charset="utf-8"> <title>Lesson 9 Part 1 - adding Forms dynamically with Javascript</title> <script src="lesson9Part1SeqA.js"></script> <script src="lesson9Part1SeqB.js"></script> <script src="lesson9Part1SeqC.js"></script> </head> <body onLoad="myMainMethod()"> <p>Lesson 9 Part 1 - Javascript with Forms</p> </body> </html> --> -
Modeling
-
Activity 1: L125 - 127 (Steps 1-7) covers lesson9Part1SeqA.js - dynamically adds a basic form and one button to HTML
Activity 2: L127 - 128 (Steps 8-9) covers lesson9Part1SeqB.js - adds radio, text and buttons by functionally dividing each form element into 3 distinct methods.
Activity 3: L128 (Steps 11-12) covers lesson9Part1SeqC.js - Sorting. Also, completes the abstraction of multiple form elements by creating re-usable methods with parameters.
-
-
Checking for Understanding - L125 (student pg 54) has students sort the array in descending order
-
Guided Practice - L129 more sorting algorithms at http://en.wikipedia.org/wiki/Sorting_algorithm. Students may also combine sorting algorithm with a parameter to decide if ascending or descending order could be used.
Stage 3: Assess
-
Assessments - L133 contains short answer "design" questions with free response question more challenging algorithm.
-
Independent Practice - students may know that JavaScript comes with its own sort() method but is not on list of objectives.
Stage 4: Act - Supplemental Resources
-
Afternoon Session II : Lesson 10 [3:45 - 5:00pm]
Lesson 10 - Students design a program with JavaScript L137-L154 - John
-
Stage 1: Plan -
-
This Lesson starts with working and complete code that the teacher can simply assign students to copy or as a reference for more complex assignments/projects.
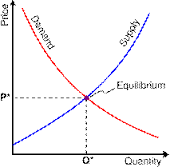
Top-Down Design (10,000 ft view) of Supply-Demand negotiation between a Supplier and a Consumer. Drill down (1 ft view) to the concept of the concept of a (Quantity, Price) point.
Stage 2: Teach - the Top-Down process is the same for many larger computer science projects
-
Anticipatory Set -
-
Supplier = Farmers will offer a Quantity of oranges at a specific Price [more quantity, higher price]
Demand/Consumer = Orange Juice Manufacturer will want less Quantity of oranges the higher the Price [higher price, less quantity]
-
How do we define this (Quantity, Price) relationship...as a 2D Point.
-
-
Modeling
-
Part 1 - L144 lists four steps in the Top-Down design approach:
-
From a description to object-oriented design features (data and functional decomposition): an EconPoint has a (Quantity, Price) relationship
-
From data and functions to class-like structures (UML diagrams): need a constructor, check for equality and toString function to test.
-
From UML to writing the class/prototype using variables/fields and methods/constructors: EconPointClass(), isEqualQuantity(otherQ), isEqualPrice(otherP), toString()
-
From a class definition to instantiating then testing EconPointClass objects
-
-
Part 2 - L147 is "on-the-fly" HTML modifications as well as Arrays of EconPointClass objects
-
-
Checking for Understanding - give students paper copy of HTML & JavaScript files.
-
Guided Practice
Part 1
-
Lesson10.htm - highlight the :
A. three JavaScript files - lesson10EconPointClass.js, lesson10EconPointTest.js, lesson10ModifyDOM.js
B. First automatic method call - <body onload="myMainTestMethod()">,
C. Second method call - <input ... onClick="myAddEconPontsToTableData()"...>
Note that the "Press to Fill Table" is explained in Part 2. This 2nd table "works" in Part 1 and can be used as student motivation for expanding the features of this lesson to include full Consumer-Producer curves.
-
lesson10EconPoint.js - defines the following "class-like" features:
- EconPointClass() constructor function/method with two parameters that define quantity and price variables/fields.
- isEqualQuantity(otherQ) method to illustrate inheritance by extending the prototype object
- isEqualPrice(otherP) method to illustrate inheritance by extending the prototype object
- toString() method which is useful for testing the EconPoint objects
-
lesson10EconPointTest.js - tests the ability to declare, instantiate and call methods from EconPointClass objects. This uses the console.log() feature of a browser's Developers' Tools. Teachers can also use the alert() method.
-
Part 2
-
lesson10ModifyDOM.js - illustrates how to construct a linear Array of EconPointClass objects and add to the table.
-
Edit Lesson10.htm so that the body tag looks like: <body onload="myMainMethod()">
-
Point out that myMainMethod() creates a single EconPointClass object at (10,10) and updates the first table in the HTML.
-
Point out that myAddEconPointsToTableData() method creates an Array of EconPointClass objects using linear model y=mx+b using a loop.
-
Stage 3: Assess
-
Assessments - L153 (71 student worksheet Free Response question) can be a challenge for students.
-
Independent Practice : lesson10Solution.htm, lesson10EconPointClassSolution.js, lesson10ModifyDOMSolution.js, lesson10EconPointTestSolution.js
Stage 4: Act - Supplemental Resources (not complete)
-
Economics Overview - L143 http://faculty.winthrop.edu/stonebrakerr/book/demand_and_supply.htm
-
Economics Indepth - L143 http://courses.byui.edu/econ_150/econ_150_old_site/lesson_03.htm
-
Daily Checkout Card:
-
What is at least one thing you learned today? ________________________________________________________________
-
What is at least one thing you would like to know more about? ___________________________________________________
-
What is at least one thing you need to work on? _______________________________________________________________