Next: NetBeans GUI Projects
Java Notes
NetBeans IDE
Sections:
- Introduction - Powerful, free, useful to students
- Downloading NetBeans
- Where to find tutorials and documentation
- Starting a new project in NetBeans
- Settings in NetBeans you might want to change
- Packaging resources with your jar file.
- Other features you might want to use
Introduction - Powerful, free, useful to students
NetBeans is a free, open-source, IDE which is available at www.netbeans.org. This is a reasonable choice, and liked by many programmers. It's similar to IntelliJ IDEA (expensive) or Eclipse (free), but it has some advantages: cheaper in the case of IntelliJ IDEA, a very good GUI form editor, and easy to install. Overall a very good choice, and my favorite.
Immediate error messages. One of the most useful features for students is the jagged red line under erroneous statements when there's a pause in the typing. NetBeans continuously compiles the program as you're typing it to alert you when there's an error. It's like the continuous spell checking of some word processors. I've gotten so used to this feature that I feel uneasy when I use an editor that doesn't do it.
Indentation and braces are serious problems for beginning students. Right clicking the source code and choosing Reformat Code reformats the entire file if nothing is selected, otherwise only the selected text. Placing the cursor beside a brace shows the matching brace.
Renaming is one of the most common operations, and NetBeans makes this easy -- even when renaming a variable like "a" because it parses the text and doesn't just use a simple textual match.
Downloading NetBeans
You must install the Java JDK before installing NetBeans. Go to java.sun.com and download J2SE 5.0 (or more recent version -- Java SE 6.0 beta 2 is quite satisfactory). Sometimes there is a link to a bundled version of the JDK and NetBeans, which, if available, can be used to install both at the same time. Otherwise install the JDK, then download and install NetBeans, which can be downloaded from www.netbeans.org.
Where to find tutorials and documentation
Check www.netbeans.org for the most current documentation and recent articles.
- NetBeans tutorials (GUI and non-GUI) from www.netbeans.org.
There are tutorials at www.netbeans.org, both for developing
Java program with the Matisse GUI editor, and without.
Version Without the Matisse editor With Matisse 5.5 NetBeans IDE 5.5 Quick Start Guide www.netbeans.org/kb/55/quickstart-gui.html The Matisse tutorials have good Flash animations showing how things were done. You can read the main page easily, but you'll need a reasonably fast Internet connection to download the animated Flash lessons.
- The Hello World with NetBeans 4.1 tutorial from faculty.ed.umuc.edu/~arnoldyl/ should work pretty well for version 5.5 too.
- I've added a section below that also gives some help getting over thru the first dialog. If you have trouble with that first dialog box, it's not you; this is the original Dialog from the Black Lagoon.
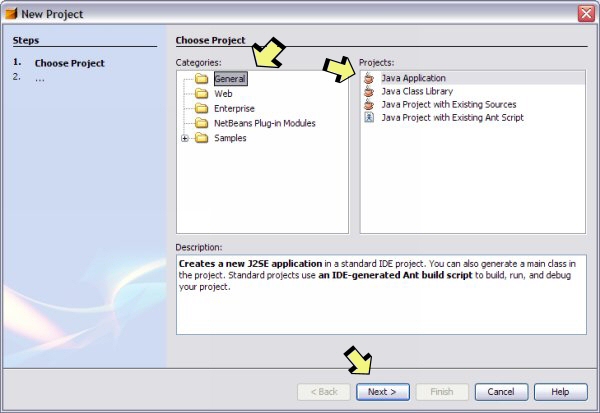
Starting a new project in NetBeans
Creating a new project isn't hard, altho the second dialog box can be slightly confusing at first. If you have trouble creating a new project, create a few dummy projects just to get used to the quirks of this first step. Just create and throw them away. It only expect to throw away the first first several attempts at building your first project. I did. It's not so bad after you've done it a few times.
- Click New Project in File menu or Welcome window.
- Choose Category General, and Project Java Application (probably the defaults). Click Next.
- The New Java Application dialog box can be surprisingly awkward
to use, but it is asking from some simple information: the name of the
project, the directory you want to put the project in,
and the name of your "main" class, if there is one.
It's made more confusing than necessary because NetBeans tries
to help you by making very bad default choices for you, which causes more problems
than solutions. If you try to fill in the text fields in an order that
makes sense to you, you might be very surprised that the the fields
interact with each other so that it overwrites what you typed earlier.
Well intentioned but very, very annoying.
After you use it a few times, it becomes easy.
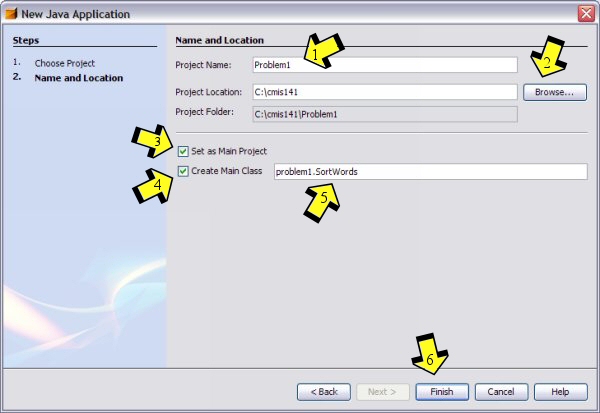
- Project Name. This is not only the name of the project,
but it also used to create a directory/folder by that name,
and after mangling the name, it becomes the default package name.
This field starts with an unhelpful name like "JavaApplication5" - change it.
Just to test it, try typing something in upper case with spaces in it, for example "X Y" (without the quotes). You'll notice in the Project Folder text field that it plans to create a folder with that name. In addition, in the last, unnamed, text field there is the same text turned to lower case, without blanks, followed by ".Main". This lower case, deblanked version will be the package name.
Choosing a lower case no-blank name for the project name is probably the least confusing to start with. That way, the project, the folder, and the package all have the same name.
Oops! I've typed in "Problem1", but if I wasn't too lazy to redo the image, I'd change that to use a more meaningful name, and make it all lower case.
- Choose a Project Location. This is the folder in which your project folder will be created. You can have many projects in this folder, so it would be best to create a folder that you will use for all projects for a class, perhaps something like "cmis141". You can either use the Browse button to find and/or create the folder, or type in a directory path. The Project Folder field below should now be automatically set for you using a combination of the Project Name and Project Location.
- Set as Main Project. Check this box.
This indicates that the project will contain
a
mainmethod and can be run as an application. Even if you don't set it now, you can later. Don't be surprised if NetBeans asks you to set it again -- it's sometimes forgetful. - Create Main Class. Check this box.
Clicking Finish creates a class from a standard
template. It contains javadoc comments, an empty constructor,
and a
mainmethod.If you didn't check the Create Main Class box, you can create a Java source file and main method later. To edit template with your own initial text see below.
- Package name and main class name are shown in the field
after the Create Main Class check box.
Change Main class name. The class name is the part after the dot and defaults to the unhelpful "Main" name. Do not use this default name. Change the name to something more meaningful like "LeapYear" or "Sudoku". Remember that class names start with an upper case character. It's fairly easy to rename classes later in NetBeans using the Refactor > Rename... popup, so don't worry if you later decide on a better name. Getting class names right is important, and I often rename my classes.
The package name is the part before the dot. It will probably already have been set from the Project Name field, but you don't really have to use this default package name. You can change it to any legal package name, or even get rid of it entirely (and the dot) to make it a "default" package. I often use "com.fredswartz.whatever" to put my "whatever" package in a package hierarchy that uniquely identifies it as mine. Package names should be in lower case.
Anonymous / default package. You technically don't have to use packages, but Sun strongly recommends that you do because it may make it easier to access resources after you've deployed your program.
- Finish. All project files will be created when you click this. The main class of your project should now be showing in the editor window. It's ready to run and you can just click the green arrow to test it at this point. Of course it doesn't do anything yet, but you can at least verify that it compiles and "runs".
- Project Name. This is not only the name of the project,
but it also used to create a directory/folder by that name,
and after mangling the name, it becomes the default package name.
This field starts with an unhelpful name like "JavaApplication5" - change it.
- The left panel now shows your project, and the right panel shows a source file. If necessary, in the project panel expand the project, then Source Packages, then the package, and now you can see all Java source files in your project.
Compiling and Running your programs in NetBeans
NetBeans allows a very quick code and test cycle. Change the source code and hit the right-facing green arrow in the toolbar to run it. This recompiles only the changed source files.
Clean and Build. The other option you should use is Clean and Build Main Project from the Build menu, or Clean and Build Project from the menu that drops down from a right click on the project. This action removes all object files and recompiles everything. This is important if you rename classes, change static final constants, need a new jar file, and probably in a few other cases. Always use this when you think you've finished a program -- it's better to have the surprises before turning it in to your instructor.
Double-clickable jar file. Build and Clean and Build create a double-clickable jar file in the "dist" directory in your project.
Settings in NetBeans you might want to change
- Indentation style settings
- To change editor settings.
- Click the Tools > Options menu item.
- In the icon display on the left, click Editor.
- In the right panel, select the Indentation tab.
- If it isn't already done, set the following:
- Statement continuation Indent: 8
- Number of Spaces per Indent: 4
- Check Expand Tabs to Spaces.
- If you like the Allman indentation style, check the Add New Line before Brace box.
- Modifying the initial template for Java classes
- When NetBeans creates one of several different types of initial
files for you, it uses a template.
Edit one or more of these templates so the files start with the
text you want, eg, comments with your name, etc.
- Select the Tools > Template Manager menu item. This displays a dialog box.
- Expand the Java Classes tree folder in the dialog box. [Ignore all the other folders.]
- Select Java Main Class or Java Class because these are what you will be using. Click the Open in Editor button at the bottom of the dialog box.
- Edit the file to look like what you want your initial file to look like. I typically change the comments to my preferred style. The text contains predefined symbols, like __DATE__, which will be expanded as appropriate when the template is used.
- Save it.
- Changing to generic, type-safe, data structures. Deprecation warnings.
- When compiling a program that uses non-generic data structures,
it's possible to accidentally add an element of the wrong type.
To alert you to places where this might be a problem, add
- Right click on the project in the Projects panel at the left.
- Select Properties at the bottom of the popup menu.
- Click on Build > Compiling in the left panel.
- To enable the most useful compiler warnings, in the Additional Compiler Options, put
-Xlint:all -Xlint:-serial
-Xlint:unchecked<[>Click OK. This turns on all warnings, but turns off warnings about not making your class serializable, which is really fine for most cases.- Also click Report Used of Deprecated APIs to be informed about obsolete library features you are using.
- Turning runtime assertion checking on
-
- Right click on the project icon in the Project panel at the left.
- Select
Propertiesat the bottom of the drop-down menu. - Click on the
Runchoice in the left panel. - In the VM Options text field at the right, enter "-ea" (without the quotes). "ea" stands for enable assertions. VM stands for Virtual Machine in this case, not virtual memory.
Packaging resources (eg images, data, ...) with your jar file
Q: How can you include resources (like images, sound, data, etc) so that your Java program doesn't need to use file paths, and so that you can package these resources in the jar file? And how do you access these resources from your program?
A: The Java class loader that loaded your program knows where the resources are. You can ask it to get other resources from the jar file. But first you have to build the jar file to include these resources. NetBeans does this automatically if you put a directory of your resources in the right place.
- Adding your resources to the project.
- Locate the
srcfolder in your NetBeans project folder. This will have subfolder(s) in it that correspond to the package(s) in your program. The final package folder will have the source code (.java files) for your program. - Create a subfolder in the folder containing the .java files. Name this folder something like "resources" or "images" or whatever might be appropriate for your data.
- Copy your data files into this folder. Keep a backup copy of the data -- if you put it in the wrong folder, NetBeans may delete it.
- Build (or Clean and Build) your project.
This will compile the code and copy the
resourcesfolder into thebuild/classes/your-packagesfolder of the NetBeans project. It will also be added to the jar file.
- Locate the
- Reading resources from your Java program.
The following example shows how to read one line from the text file
initial-board.sdkwhich is located in theresourcesdirectory. The main program is calledSudoku.//... Reads one line of text from a file saved in jar file. final String RESOURCE_LOCATION = "resources/initial-board.sdk"; InputStream instream = Sudoku.class.getResourceAsStream(RESOURCE_LOCATION); Scanner in = new Scanner(instream); String initial_board = in.nextLine(); in.close();
There are a few things to note about this code.
- There are a couple of ways to get a
Classobject - either from the.classfield if you specify the name of a class (as above), or by callinggetClass()on an object. - A
Classobject has two methods for getting resources:getResourceAsStream(name)which returns anInputStreamthat can be used withScanneror any other way of reading. This is used in the example above.getResource(name)which returns aURL. The URL is more general and can be used to get the InputStream. It can also be used directly in theIconImage(url)constructor, or various other ways to get images (getImage()) or sound (getAudioClip()).
- There are a couple of ways to get a
Other features you might want to use
- Importing packages into a project
-
To use other packages (eg, com.fredswartz.ezgui), NetBeans has to know where to find them. Here is the process.
- Right click on the project in the Projects panel at the left.
- Select Properties at the bottom of the popup menu.
- Click on Libraries in the left panel.
- On the right, click Add JAR/Folder....
- Move around the file system to select the appropriate jar file, click Open, then OK.
- Abbreviations
- NetBeans Quick Tip #6 - Abbreviations in Editor
- Misc
-
- PMD - pmd.sourceforge.net - A wonderful plugin that analyzes your source program for bad programming practices. Highly recommended.
- www.nbextras.org - Open source plugins for NetBeans.
- Clearing Find results.
Q: When you search for text, all occurences will be highlighted, which is good, but how to do you get rid of the highlighting?
A: Use Find again, but with no text. Or use Alt-Shift-H.