Index of Topics by Sample Robot
Index of Topics by Sample Robot If the best way to learn is by building your own robot, the second-best way is to look at the gizzards of other robots.
The sample robots showcase a broad range of features, and it is possible to build a satisfactory robot simply by piecing together the best that the samples have to offer. This index is a guide of which specific subjects are used where in the samples.
Subject |
Where to look |
AdvancedRobot class |
Crazy
|
Custom Events |
Target |
normalAbsoluteAngle() |
Tracker.normalAbsoluteAngle() |
normalRelativeAngle() |
Corners.normalRelativeAngle()
|
Persistence (file I/O) |
SittingDuck |
reverseDirection() |
Crazy.reverseDirection() |
Robot class |
Corners
|
scan() method |
Corners.onScannedRobot()
|
set�() methods |
Crazy.run()
|
stop() and resume() methods |
Corners.onScannedRobot() |
Victory dance |
Tracker.onRobotDeath()
|
waitFor() method |
Crazy.run() |
With thanks from - http://web.archive.org/web/20130130005309/http://web.archive.org/web/20040805181211/http://www.ug.cs.usyd.edu.au/~csled/biwf/robocode/topics.html and http://www.eng.auburn.edu/~sealscd/AI/robocode/
Tutorial 1 - Robocode Battlefield Basics
In this lesson, we describe the basics of getting around the battlefield.
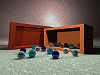
Robot Anatomy
Your robot consists of three parts: the "tank" (body), the gun, and the radar.

Image taken from http://www-106.ibm.com/developerworks/java/library/j-robocode/index.html
Each of these parts can be moved independently from each other, provided you call the setAdjustGunForRobotTurn(true) or setAdjustRadarForRobotTurn(true) methods.
Sample robot:
Show each of the three parts turning independently. Incidentally, it also shows how you can print debug statements. (Click on the button with the robot's name on the right to see debug output.)
Notice that the tank moves pretty slow, the gun turret moves faster, and the radar moves faster still.
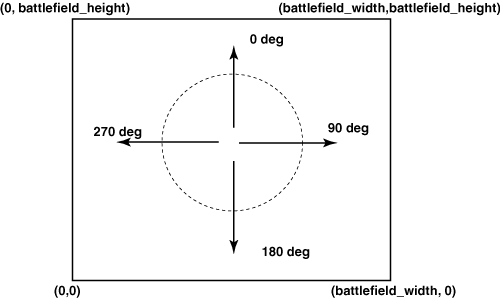
Battlefield Measurements
The battlefield is laid out in a cartesian plane with the origin in the lower-left corner. Degree measurements are top-wise; in other words, 0/360 is at the top.
Sample robot: Walls - demonstrates how you can move around the battlefield and hit the walls.
Note that even though we called ahead(5000) the call returns as soon as the robot hits a wall. (See the Robocode API.)
Bearings
You can get your degree heading by calling getHeading(), but there are occasions where you get a Bearing, that is to say, a degree measurement from -180 to 180 that represents your offset from something (a wall, another robot, etc.)
By using the bearing, you can easily turn toward something else like so:
turnRight(event.getBearing());
Note that because a bearing is a value from -180 to 180, calling turnRight() will actually make you turn left if the bearing is negative -- this is by design and it is what you want to have happen.
Sample robot: RamFire - an example of how to turn your robot toward an enemy and ram into him. (Match him up against one other robot that moves a little bit like Tracker, SpinBot or Crazy.)
Downloaded (& re-formatted) from Mark Whitley originally at http://mark.random-article.com/weber/java/robocode/lesson2.html
Tutorial 2 - Gun Basics
In this lesson, we describe the basics of turning and aiming your gun. Some of this stuff gets a little heavy...
Independent Gun Movement
Your robot consists of three parts, all of which can move independently, and the tank part moves slowest of all.
One improvement we could make is to divorce gun movement from robot movement.
This can be done easily by calling setAdjustGunForRobotTurn(true). Thereafter, you can make calls like turnGunRight() (or better yet setTurnGunRight()) to turn the gun independently. Now you can turn the gun one direction and move the tank a different direction.
Simple Aiming Formula
We can easily turn the gun toward our opponent when we scan him by using a formula similar to the narrow beam scan from last week: we find the difference between our tank heading (getHeading()) and our gun heading (getGunHeading()) and add the bearing to the target (getBearing()), like so:
setTurnGunRight(getHeading() - getGunHeading() + e.getBearing());
Firepower Calculation Formula
Another important aspect of firing is calculating the firepower of your bullet. The documentation for the fire() method explains that you can fire a bullet in the range of 0.1 to 3.0. As you've probably already concluded, it's a good idea to fire low-strength bullets when your enemy is far away, and high-strength bullets when he's close.
You could use a series of if-else-if-else statements to determine firepower, based on whether the enemy is 100 pixels away, 200 pixels away, etc. But such constructs are a bit too rigid. After all, the range of possible firepower values falls along a continuum, not discrete blocks. A better approach is to use a formula. Here's an example:
setFire(400 / enemy.getDistance());
With this formula, as the enemy distance increases, the firepower decreases. Likewise, as the enemy gets closer, the firepower gets larger. Values higher than 3 are floored to 3 so we will never fire a bullet larger than 3, but we should probably floor the value anyway (just to be on the safe side) like so:
setFire(Math.min(400 / enemy.getDistance(), 3));
More Efficient Aiming
As you may have noticed, Shooter has a problem: sometimes he turns his gun barrel the long way around to aim at an enemy. (Sometimes he just sits there spinning his gun barrel.) Worst case, he might turn his gun 359 degrees to hit an enemy that is 1 degree away from his gun.
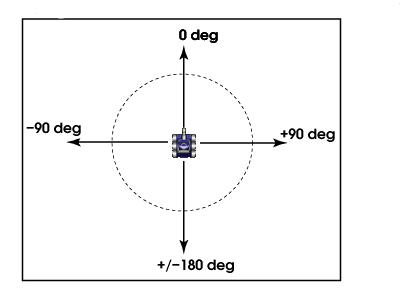
Normalized Bearings
The problem is the result of getting a non-normalized bearing from the simple aiming formula above. A normalized bearing (like the kind you get in a ScannedRobotEvent) is a bearing between -180 and +180 degrees as depicted in the following illustration:
A non-normalized bearing could be smaller than -180 or larger than 180. We like to work with normalized bearings because they make for more efficient movement. To normalize a bearing, use the following function:
// normalizes a bearing to between +180 and -180
double normalizeBearing(double angle) {
	while (angle >  180) angle -= 360;
	while (angle < -180) angle += 360;
	return angle;
}
Note the use of while statements rather than if statements to handle cases where the angle passed is extremely large or extremely small. (A while is just like an if, except it loops.)
Avoiding Premature Shooting
Even after you normalize the bearing, you could still fire prematurely.
To avoid premature shooting, call the getGunTurnRemaining() method to see how far away your gun is from the target and don't fire until you're close.
Additionally, you cannot fire if the gun is "hot" from the last shot and calling fire() (or setFire()) will just waste a turn. We can test if the gun is cool by calling getGunHeat().
The following code snippet tests for both of these:
// if the gun is cool and we're pointed at the target, shoot!
if (getGunHeat() == 0 && Math.abs(getGunTurnRemaining()) < 10)
	setFire(firePower);
(Feel free to test with values other than 10.)
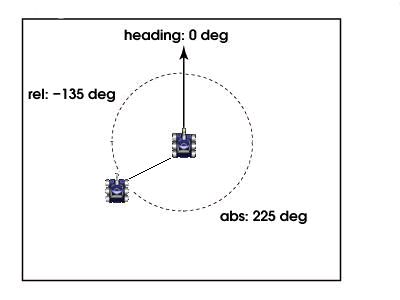
Digression: Absolute Bearings
In contrast to a relative bearing, an absolute bearing is a value between 0 and +360 degrees. The following illustration shows bothe the relative and absolute bearing from one robot to another:
Absolute bearings are often useful. You guys computed an absolute bearing from a relative bearing in your AdvancedEnemyBot class to get the x,y coordinates of an enemy.
Another application of absolute bearings is to get the angle between two arbitrary points. The following function will do this for you:
// computes the absolute bearing between two points
double absoluteBearing(double x1, double y1, double x2, double y2) {
	double xo = x2-x1;
	double yo = y2-y1;
	double hyp = Point2D.distance(x1, y1, x2, y2);
	double arcSin = Math.toDegrees(Math.asin(xo / hyp));
	double bearing = 0;

	if (xo > 0 && yo > 0) { // both pos: lower-Left
		bearing = arcSin;
	} else if (xo < 0 && yo > 0) { // x neg, y pos: lower-right
		bearing = 360 + arcSin; // arcsin is negative here, actuall 360 - ang
	} else if (xo > 0 && yo < 0) { // x pos, y neg: upper-left
		bearing = 180 - arcSin;
	} else if (xo < 0 && yo < 0) { // both neg: upper-right
		bearing = 180 - arcSin; // arcsin is negative here, actually 180 + ang
	}

	return bearing;
}
Predictive Targeting
Or: "Using Trigonometry to impress your friends and destroy your enemies
One last problem remains: If you look at how any of the previous robots fares against Walls, they always miss. The reason this problem occurs is because it takes time for the bullet to travel. By the time the bullet gets there, Walls has already moved on.
If we wanted to be able to hit Walls (or any other robot) more often, we'd need to be able to predict where he will be in the future, but how can we do that?
Distance = Rate x Time
Using D = RxT we can figure out how long it will take a bullet to get there.
- Distance: can be found by calling enemy.getDistance()
- Rate: per the Robocode FAQ, a bullet travels at a rate of 20 - firepower * 3.
- Time: we can compute the time by solving for it:
D = RxT --> T = D/R
The following code does it:
// calculate firepower based on distance
double firePower = Math.min(500 / enemy.getDistance(), 3);
// calculate speed of bullet
double bulletSpeed = 20 - firePower * 3;
// distance = rate * time, solved for time
long time = (long)(enemy.getDistance() / bulletSpeed);
Getting Future X,Y Coordinates
Next, we can use the AdvancedEnemyBot class you guys all wrote, which contains the methods getFutureX() and getFutureY(). To make use of the new features, we need to change our code from:
public class Shooter extends AdvancedRobot {
	private EnemyBot enemy = new EnemyBot();
to:
public class Shooter extends AdvancedRobot {
	private AdvancedEnemyBot enemy = new AdvancedEnemyBot();
Then in the onScannedRobot() method, we need to change the code from:
public void onScannedRobot(ScannedRobotEvent e) {

	// track if we have no enemy, the one we found is significantly
	// closer, or we scanned the one we've been tracking.
	if ( enemy.none() || e.getDistance() < enemy.getDistance() - 70 ||
			e.getName().equals(enemy.getName())) {

		// track him
		enemy.update(e);
	}
	...
to:
public void onScannedRobot(ScannedRobotEvent e) {

	// track if we have no enemy, the one we found is significantly
	// closer, or we scanned the one we've been tracking.
	if ( enemy.none() || e.getDistance() < enemy.getDistance() - 70 ||
			e.getName().equals(enemy.getName())) {

		// track him using the NEW update method
		enemy.update(e, this);
	}
	...
The alert student will note that it is entirely possible to use the old update method, with unfortunate results. Fair warning.
Turning the Gun to the Predicted Point
Lastly, we get the absolute bearing between our tank and the predicted location using the absoluteBearing function above. We then find the difference between the absolute bearing and the current gun heading and turn the gun, normalizing the turn to take the shortest path there.
// calculate gun turn to predicted x,y location
double futureX = enemy.getFutureX(time);
double futureY = enemy.getFutureY(time);
double absDeg = absoluteBearing(getX(), getY(), futureX, futureY);
// turn the gun to the predicted x,y location
setTurnGunRight(normalizeBearing(absDeg - getGunHeading()));
Sample robot:PredictiveShooter uses the stuff described above to anticipate where his enemy will be. Match him up against Walls and watch the magic happen.
Downloaded (& re-formatted) from Mark Whitley originally at http://mark.random-article.com/weber/java/robocode/lesson4.html
Tutorial 3 - Scanning
In this lesson, we describe the basics of how the scanning works.
Robot Senses
We'll begin this lesson by discussing your robot's senses. It has only a few.
Sense of Touch
Your robot knows when it's:
- hit a wall (onHitWall),
- been hit by a bullet (onHitByBullet),
- or hit another robot (onHitRobot).
All of these methods pass you events that give you information about what you touched.
Sense of Sight
Your robot knows when it's seen another robot, but only if it scans it (onScannedRobot).
Scan events are arguably the most important of all events. Scan events give you information about the other robots on the battlefield. (Some robots put 90+% of their code in the onScannedRobot method.) The only way scan events can be generated (practically speaking) is if you move your radar. (If an enemy robot wanders in front of your radar it will generate a scan event, but you should really take a more proactive stance.)
Also, remember previous Lesson, the scanner is the fastest moving part of your robot, so don't be stingy about moving it.
If you want to, you can make the robots' scan arcs visible by selecting Options Menu -> Preferences -> View Options Tab and click on the "Visible Scan Arcs" checkbox. This is handy when debugging.
Other Senses
Your robot also knows when he's died (onDeath), when another robot has died (onRobotDeath -- we will use this one today), or when he's won the round (onWin -- this is where you write the code for your victory dance).
Your robot also is aware of his bullets and knows when a bullet has hit an opponent (onBulletHit), when a bullet hits a wall (onBulletMissed), when a bullet hits another bullet (onBulletHitBullet).
Building A Better Robot
Here's some basic scanning movement. Note again that we call setAdjustRadarForRobotTurn(true) so as to have independent radar movement.
Serial Movements with The Robot Class
You want to find other robots to kill. To do that, you need to scan for other robots. The simplest approach to scanning is to just turn the radar around and around. Your run method could look something like this:
public void run() {
	setAdjustRadarForRobotTurn(true);
	while (true) {
		turnRadarRight(360);
	}
}
Indeed, our beloved BearingBot from last week did exactly that: he rotates his radar and moves closer to whoever he scans.
You may have noticed that BearingBot has a large defect that you can see if you match him up against an opponent that moves a lot (like, say, Crazy). He scans an opponent, then moves to where he saw him, and by the time he gets there, the opponent has moved away.
Compound Movements with the AdvancedRobot Class
It would be great if we could do more than one thing at once (scan AND turn AND fire). Thankfully, the powers that be have provided us with a means to accomplish this: The AdvancedRobot base class, which allows us to make non-blocking calls to move the robot and then executes them all as a compound action. Crazy and SpinBot (and oddly enough SittingDuck) are all examples of advanced robots.
To change your robot to an advanced robot, just change your class declaration from:
class MyRobot extends Robot {
	...
to
class MyRobot extends AdvancedRobot {
	...
Now you're inheriting from AdvancedRobot rather than Robot;
now you can use the set* methods provided by the AdvancedRobot class.
(We will discuss more about inheritance when we cover chapter 5.)
Sample robot:AdvancedBearingBot a great improvement over 'BearingBot', because he can do compound movements.
Sample robot:AdvancedTracker - This is a modification of the 'Tracker' sample robot. Per the source code for Tracker, notice how much he improves when you turn him into an AdvancedRobot.
Important Note: If you make a robot derived from AdvancedRobot, you must call the execute() method to perform all the queued-up actions.
But AdvancedBearingBot has another large defect which you can see if you match him up against more than one opponent: he goes driving all over the battlefield chasing one robot after another and doesn't get a lot accomplished. This is because his radar keeps scanning robots, and he chases every one he scans. In short, he lacks focus.
Locking Onto an Enemy
Narrow Beam
We can easily lock onto our opponent by constantly turning the radar toward him whenever we scan him. Intuatively, you might think of doing something with the scanned robot's bearing like so:
    public void onScannedRobot(ScannedRobotEvent e) {
		// Lock on to our target (I hope...)
		 setTurnRadarRight(e.getBearing());
		 ...
There's a problem with this, though: the ScannedRobotEvent gives us a bearing to the scanned robot but it is relative to our tank's position, not our radar's position. How do we resolve this little quandry?
Easy: we find the difference between our tank heading (getHeading()) and our radar heading (getRadarHeading()) and add the bearing to the scanned robot (e.getBearing()), like so:
    public void onScannedRobot(ScannedRobotEvent e) {
		// Lock on to our target (this time for sure)
		setTurnRadarRight(getHeading() - getRadarHeading() + e.getBearing());
		...
Sample robot: NarrowBeam - Uses the above source to lock onto an opponent and nail him. Match him up against as many opponents as you want.
A recurring theme in the computer industry is that the solution to one problem leads to the creation of another. Fittingly, having solved the problem of how to lock onto a target, we are now faced with another problem, which the following screenshot illustrates:
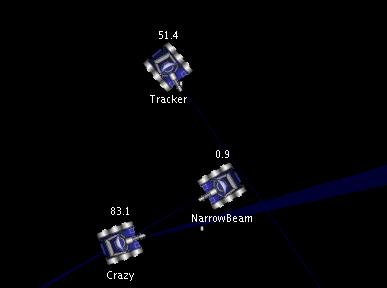
Note that NarrowBeam has locked on so tightly to Crazy that he is blithely unaware that Tracker is killing him from behind.
Oscillating (or "Wobbling") the Radar
In this technique, every time you see an opponent, you whipsaw the radar back so as to focus on one robot and continuously generate scan events. This is an improvement over the narrow beam because you are more aware of nearby robots.
To make this work, you need a variable that keeps track of which direction to turn the radar, it will only ever have values of 1 and -1, so it can be small. You can declare it in your robot like so:
class MyRobot extends AdvancedRobot {
	private byte scanDirection = 1;
	...
The run method can look just like the one above, but in the onScannedRobot method you do the following:
public void onScannedRobot(ScannedRobotEvent e) {
	...
	scanDirection *= -1; // changes value from 1 to -1
	setTurnRadarRight(360 * scanDirection);
	...
Flipping the value of scanDirection creates the oscillating effect.
Sample robot: Oscillator - wobbles his radar to keep track of hist opponent. Note that while he tends to track an enemy, he'll chase others that are nearby, too.
But we still haven't completely solved the problem with NarrowBeam: other robots can still sneak up behind Oscillator and shoot him. Also, Oscillator tends to get a little unfocused, at times.
Enemy Tracking
Using the EnemyBot Class
A further improvement that could be made would be to single out an individual robot, focus on him, and destroy him completely. The sample robot Tracker does this to a limited extent, but we'll do one better with the EnemyBot class you guys all wrote.
To keep track of the information about an enemy robot, you first need to make a member variable in your robot like so:
class MyRobot extends AdvancedRobot {
	private EnemyBot enemy = new EnemyBot();
	...
You will want to reset (clear) your enemy at the top of your run method like so:
public void run() {
	setAdjustRadarForRobotTurn(true);
	enemy.reset();
	while (true) {
		setTurnRadarRight(360);
		...
		execute();
	}
}
And you need to update the enemy's information in the onScannedRobot method like so:
public void onScannedRobot(ScannedRobotEvent e) {
	if (enemy.none() || e.getName().equals(enemy.getName())) {
		enemy.update(e);
	}
	...
From this point, you can use all of the information about the enemy in any other method of your class.
There is one last detail, though, if the enemy you're tracking dies, you'll want to reset it so you can track another. To do that, implement an onRobotDeath method like so:
public void onRobotDeath(RobotDeathEvent e) {
	if (e.getName().equals(enemy.getName())) {
		enemy.reset();
	}
}
Sample robot:EnemyTracker - a robot that uses the EnemyBot class. Note that even though he rotates the radar, he just tracks one enemy. This allows him to keep an eye on what's going on in the rest of the battlefield while concentrating on his target.
Slightly Smarter Tracking
Another small optimization could be made here: If a closer robot moves into view, we probably want to start shooting him instead. You can accomplish this by modifying your onScannedRobot method like so:
public void onScannedRobot(ScannedRobotEvent e) {

	if (
		// we have no enemy, or...
		enemy.none() ||
		// the one we just spotted is closer, or...
		e.getDistance() < enemy.getDistance() ||
		// we found the one we've been tracking
		e.getName().equals(enemy.getName())
		) {
		// track him
		enemy.update(e);
	}
	...
Sample robot:EnemyOrCloser uses the above scanning technique to hit the closest enemy. As he rotates his radar, he will begin tracking any enemy that is closer (even if someone sneaks up behind him).
Downloaded (& re-formatted) from Mark Whitley originally at http://mark.random-article.com/weber/java/robocode/lesson3.html
Tutorial 4 - Movement
This is your last lesson, and to round things out, we come back to where we started in Lesson on moving your robot. We'll bring it on home this week by showing you how to close in on your enemy, dodge bullets, and avoid walls.
Sideways Thinking
If you've played basketball before, you know that if you want to defend someone holding the ball, you want to maximize your lateral movement by always squaring off against them (facing them). The same is true with your robot as the following picture illustrates:
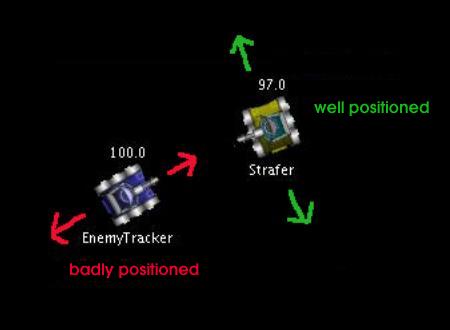
The yellow robot can easily move side to side to evade the blue robot and dodge the bullets he shoots. The blue robot, by contrast, doesn't have any good place to go: if he moves back, he gets shot at by the yellow bot, if he moves forward to try to ram, the yellow bot can just scoot out of the way.
Squaring Off
To square off against an opponent, use the following code:
setTurnRight(enemy.getBearing() + 90);
which will always place your robot perpendicular (90 degrees) to your enemy.
Forward or Backward?
When you're squared off against an opponent, the ideas of "forward" and "backward" become somewhat obsolete. You're probably thinking more in terms of "strafe left" or "strafe right". To keep track of the movement direction, just declare a variable like we did for oscillating the radar.
class MyRobot extends AdvancedRobot {
	private byte moveDirection = 1;
then, when you want to move your robot, you can just say:
setAhead(100 * moveDirection);
You can switch directions by changing the value of moveDirection from 1 to -1 like so:
moveDirection *= -1;
Switching Directions
The most intuative approach to switching directions is to just flip the move direction any time you hit a wall or hit another robot like so:
public void onHitWall(HitWallEvent e) { moveDirection *= -1; }
public void onHitRobot(HitRobotEvent e) { moveDirection *= -1; }
However, you will find that if you do that, you'll end up doggedly pressing up against a robot that rams you from the side (like a dog in heat). That's because onHitRobot() gets called so many times that the moveDirection keeps flipping and you never move away.
A better approach is to just test to see if your robot has stopped. If it has, it probably means you've hit something and you'll want to switch direction. You can do it with the code:
if (getVelocity() == 0)
	moveDirection *= -1;
Put that into your doMove() method (or wherever else you're handling movement) and you can handle all wall-hit and robot-hit events.
Shall We Dance?
All the sample robots that follow use the above techniques for moving around their enemies, with some minor variations. You can match them up against any of the sample robots.
Circling
Circling your enemy can be done by simply using the above techniques:
public void doMove() {

	// switch directions if we've stopped
	if (getVelocity() == 0)
		moveDirection *= -1;

	// circle our enemy
	setTurnRight(enemy.getBearing() + 90);
	setAhead(1000 * moveDirection);
}
Sample robot: Circler circles his enemy using the above movement code, rather like a shark circling it's prey in the water.
Strafing
One problem you might notice with Circler is that he is easy prey for predictive targeting because his movements are so... predictable. Match Circler up against PredictiveShooter and watch how quick he goes down.
To evade bullets more effectively, you should move side-to-side or "strafe". A good way to do this is to switch direction after a certain number of "ticks", like so:
public void doMove() {

	// always square off against our enemy
	setTurnRight(enemy.getBearing() + 90);

	// strafe by changing direction every 20 ticks
	if (getTime() % 20 == 0) {
		moveDirection *= -1;
		setAhead(150 * moveDirection);
	}
}
Oddly, MyFirstRobot does something along these lines and can be surprisingly hard to hit.
Sample robot: Strafer rocks back and forth useing the above movement code. Notice how nicely he dodges bullets.
Closing In
You'll notice that both Circler and Strafer have another problem: they get stuck in the corners easy and end up just banging into the walls. An additional problem is that if their enemy is distant, they shoot a lot but don't hit a lot.
To make your robot close in on your enemy, just modify the "squaring off" code to make him turn in toward his enemy slightly, like so:
setTurnRight(normalizeBearing(enemy.getBearing() + 90 - (15 * moveDirection)));
Sample robot: Spiraler is a variation on Circler that uses the above code to spiral in toward his enemy.
Sample robot:StrafeCloser is a variant on Strafer that uses the above code to strafe ever closer. He's a pretty good bullet-dodger, too.
Note that neither of the above robots gets caught in a corner for very long.
Avoiding Walls
A problem with all of the above robots is that they hit the walls a lot, and hitting the walls drains your energy. A better strategy would be to stop before you hit the walls. But how?
Adding a Custom Event
The first thing you need to do is decide how close we will allow our robot to get to the walls:
public class WallAvoider extends AdvancedRobot {
	...
	private int wallMargin = 60;
Next, we add a custom event that will be fired when a certain condition is true:
// Don't get too close to the walls
addCustomEvent(new Condition("too_close_to_walls") {
		public boolean test() {
			return (
				// we're too close to the left wall
				(getX() <= wallMargin ||
				 // or we're too close to the right wall
				 getX() >= getBattleFieldWidth() - wallMargin ||
				 // or we're too close to the bottom wall
				 getY() <= wallMargin ||
				 // or we're too close to the top wall
				 getY() >= getBattleFieldHeight() - wallMargin)
				);
			}
		});
Note that we are creating an anonymous inner class with this call. (You guys will do a lot of this sort of thing when we do GUI stuff.) We need to override the test() method to return a boolean when our custom event occurs.
Handling the Custom Event
The next thing we need to do is handle the event, which can be done like so:
public void onCustomEvent(CustomEvent e) {
	if (e.getCondition().getName().equals("too_close_to_walls"))
	{
		// switch directions and move away
		moveDirection *= -1;
		setAhead(10000 * moveDirection);
	}
}
The problem with that approach, though is that this event could get fired over and over, causing us to rappidly switch back and forth, never actually moving away.
Sample robot:JiggleOfDeath demonstrates the flaw in the above approach. Match him up against Walls and watch him go down.
To avoid this "jiggle of death" we should have a variable that indicates that we're handling the event. We can declare another like so:
public class WallAvoider extends AdvancedRobot {
	...
	private int tooCloseToWall = 0;
Then handle the event a little smarter:
public void onCustomEvent(CustomEvent e) {
	if (e.getCondition().getName().equals("too_close_to_walls"))
	{
		if (tooCloseToWall <= 0) {
			// if we weren't already dealing with the walls, we are now
			tooCloseToWall += wallMargin;
			setMaxVelocity(0); // stop!!!
		}
	}
}
Handling the Two Modes
There are two last problems we need to solve. Firstly, we have a doMove() method where we put all our normal movement code. If we're trying to get away from a wall, we don't want our normal movement code to get called, creating (once again) the "jiggle of death". Secondly, we want to eventually return to "normal" movement, so we should have the tooCloseToWall variable "time out" eventually.
We can solve both these problems with the following doMove() implementation:
public void doMove() {
	// always square off against our enemy, turning slightly toward him
	setTurnRight(enemy.getBearing() + 90 - (10 * moveDirection));

	// if we're close to the wall, eventually, we'll move away
	if (tooCloseToWall > 0) tooCloseToWall--;

	// normal movement: switch directions if we've stopped
	if (getVelocity() == 0) {
		moveDirection *= -1;
		setAhead(10000 * moveDirection);
	}
}
Sample robot: WallAvoider uses all the above code to avoid running into the walls. Match him up against Walls and note how he gently glides toward the sides but never (well, rarely) hits them.
Multi-Mode Bot
Besides the colors you chose, the biggest part of your robot's personality is in his movement code. On the other hand, different situations call for different tactics. Using the wall-avoiding as an example, you may want to code your bot to change "modes" based on certain criteria. Using your Lab 5 exercise as a starting point, I can picture a robot with a method like this in it:
public void onRobotDeath(RobotDeathEvent e) {
	...
	if (getOthers() > 10) {
		// a large group calls for fluid movement
		tank = new CirclingTank();
	} else if (getOthers() > 1) {
		// dodging is the best small-group tactic
		tank = new DodgingTank();
	} else if (getOthers() == 1) {
		// if there's only one bot left, hunt him down
		tank = new SeekAndDestroy();
	}
	...
}
The details are left (as always) as an exercise for the student.
Downloaded (& re-formatted) from Mark Whitley originally at http://mark.random-article.com/weber/java/robocode/lesson5.htm
Lab 2 - The "EnemyBot"
EnemyBot class
Specifications
Write a class that can hold the information about an enemy robot.
Detail
-
In a new file called "EnemyBot.java" make a public class called EnemyBot. (Remember: the filename must be the same as the class name + a .java extension.)
-
Add the following private variables to the class: bearing, distance, energy, heading, name, velocity. All of these will be of type double except for name which will be of type String.
-
Add the following public accessor methods to the class: getBearing(), getDistance(), getEnergy(), getHeading(), getName(), getVelocity(). These will all return the values in the private variables.
-
Implement a state-change method called update which takes a ScannedRobotEvent as a parameter. Call the ScannedRobotEvent's methods (same names as the ones in step #3) to set your private variables (step #2). The update method will return void.
-
Implement another state-change method called reset which sets the name variable to the empty string ("") and all the variables of type double to 0.0. The reset method will also return void.
-
Implement a (state-reporting) accessor method called none which will return true if name is "" or false otherwise. (Remember to use the equals() method of the String class.) Basically, this method will return true if the reset method was just called.
-
Lastly, implement a public constructor which just calls reset. Note: the constructor must be the same name as the class. Also, constructors never specify a return value.
Questions and Answers
-
Do I derive this class from Robot or AdvancedRobot?
Neither. This is a standalone class that does not (explicitly) inherit from anything.
-
Do I make a main() method or a run() method in here?
Neither. Again, this is a standalone class.
-
Help! It won't compile!
Be sure to import stuff from the robocode package by putting this line at the top of your EnemyBot.java file:
import robocode.*;
-
Help! It still won't compile!
You might notice that, even after you import everything from the robocode package, when you try to compile the code it spits out a bunch of "could not resolve symbol" errors. This is because the compiler doesn't know where to find the robocode classes that you're trying to use.
Basically, you can set the classpath in one of two ways:
-
Give the javac compiler a command-line argument: Instead of typing
javac EnemyBot.java
instead type
javac -classpath c:\robocode\robocode.jar EnemyBot.java
-
Alternatively you could... Set the CLASSPATH environment variable: p.137 in your book explains how to do this. On a DOS/Win* box you can type
set CLASSPATH=c:\robocode\robocode.jar;.
That ";." at the end means "include the current directory in the classpath". You will surely want to do that. If you are using WinNT/XP/2K/03 you should set this in the "System" proglett in the control panel.
Warning: If you cut-n-paste the above commands into a DOS prompt, you may include a trailing space which will give you no end of headaches. Just type it in.
-
-
Now I can't compile a robot that uses the EnemyBot class!
The problem you are now experiencing concerns the way Java handles packages. For starters, you need to be sure that both your robot and the EnemyBot class belong to the same package and that they live in a directory with the same name as the package. Example, if my initials were "mkw" and I was making a robot called MyBot, I would put the line:
package mkw;
at the top of both EnemyBot.java and MyBot.java.
Next, to compile these files, you actually need to be one directory up from the directory where the files live. So, change into the c:\robocode\robots directory and type:
			javac mkw\EnemyBot.java
			javac mkw\MyBot.java
Note: the reason why you should compile EnemyBot independently is so the right package / directory path gets written to the .class file. You should only need to do this once.
-
Can't I just store the ScannedRobotEvent?
You may have noticed that I'm asking you to duplicate many of the methods (and data) that are found in the ScannedRobotEvent class and are thinking that you could just make a ScannedRobotEvent member variable.
Answer: It will not work. Remember, primitives are passed by value and objects are passed by reference. If you try to store the reference, the Robocode engine will destroy the object before you get a chance to use it and your code will throw a bunch of exceptions. ScannedRobotEvents are ephemeral so you have only a brief time to use them.
If you really don't believe me, you're welcome to try... :-)
-
How big does the file have to be?
I was able to meet the above specifcations in about 45 lines of code (including comments and curlies). Lots of it was cut 'n paste, too.
-
Where do I put this file?
Put it in the c:\robocode\robots\[initials] directory because you're going to use it with your robot.
You do need to print it up and give me a copy, though.
-
How do I show you this working?
Write a robot that uses it and show me it running around killing other robots. You will surely want to read Robocode Lesson #3 for advice on how to do this.
Downloaded (& re-formatted) from Mark Whitley originally at http://mark.random-article.com/weber/java/ch3/lab2.html
Lab 3- Advanced EnemyBot class
Specifications
Write a class that extends the EnemyBot class you wrote last week.
Details
- In a file called "AdvancedEnemyBot.java" please declare a public class called AdvancedEnemyBot that extends EnemyBot. (Both files need to be in the same directory.)
- Declare 2 new private variables in AdvancedEnemyBot called: x and y. They will be of type double.
- Add the accessor methods getX() and getY(); they will return the appropriate variables.
- Override the parent class' reset() method and write the following code inside it: first, call the parent's reset() method as super.reset() so that it will blank out all of its variables; second, set all the AdvancedEnemyBot's private class variables to 0.
- Make a constructor for the class which simply calls the reset() method. (Your own, not the parent class'.)
-
Write a new update() method which takes two parameters: a
ScannedRobotEvent (call it e) and a Robot (call
it robot -- ain't case-sensetivity grand?). (Note that you are
not overriding the parent class' update() method because
it takes only one parameter.)
Inside the AdvancedEnemyBot's update() method, please do the following:
- Call the parent class' update() method with super.update(), passing it the ScannedRobotEvent that was passed to this method. (And yes, I realize that using the super keyword is unnecessary here, but it makes the code more obvious and self-documenting.)
- Compute the absolute bearing between the robot and the enemy with
the following code:
				double absBearingDeg = (robot.getHeading() + e.getBearing());
				if (absBearingDeg < 0) absBearingDeg += 360;
- Set the x variable using the following code:
				// yes, you use the _sine_ to get the X value because 0 deg is North
				x = robot.getX() + Math.sin(Math.toRadians(absBearingDeg)) * e.getDistance();
- Set the y variable using the following code:
				// yes, you use the _cosine_ to get the Y value because 0 deg is North
				y = robot.getY() + Math.cos(Math.toRadians(absBearingDeg)) * e.getDistance();
- Make an accessor method called getFutureX() which takes a
long parameter (call it when) and returns a double. Use
the following code to implement it:
return x + Math.sin(Math.toRadians(getHeading())) * getVelocity() * when;
- Lastly, make an accessor method called getFutureY() which
takes a long parameter (call it when) and returns a
double. Use the following code to implement it:
return y + Math.cos(Math.toRadians(getHeading())) * getVelocity() * when;
Questions and Answers
-
Help! It won't compile!
Please look at last week's Q & A for answers to this.
-
How do I show you this lab working?
Make a robot that uses the AdvancedEnemyBot class you wrote and show me it running around the screen, tracking enemies and shooting at them.
-
Can you explain the Trigonometry stuff to me?
Yeah, probably.
-
How come we're learning so much math in a Java class?
Remember back in your math classes when you used to ask "When are we ever gonna use this stuff?" Well, class, your day has come. Be thankful that I'm giving you the code rather than making you figure it all out by yourself.
Downloaded (& re-formatted) from Mark Whitley originally at http://mark.random-article.com/weber/java/ch3/lab2.html
Lab 4 - Inner Classes - RobotPart interface
Specifications
Write an interface called RobotPart and three classes that implement it called Radar, Gun, and Tank.
All of these interfaces / classes will be written inside a Robot class, making them all inner classes.
The RobotPart Interface
Declare an interface called RobotPart. It should have two method stubs: init() and move().
The Radar Class
Write a class called Radar that implements the RobotPart interface. You will need to override both of the interface's methods.
- In the override of the init() method, you will probably want to call setAdjustRadarForGunTurn(true).
- In the override of the move() method, you will want to move the radar somehow.
Oscillating the radar: You may be wondering how to wobble the scanner outside of the onScannedRobot method. Here's how you can do it:
		double turn = getHeading() - getRadarHeading() + enemy.getBearing();
		turn += 30 * radarDirection;
		setTurnRadarRight(normalizeBearing(turn));
		radarDirection *= -1;
The radarDirection variable can be declared within the Radar class and initialized to 1. (Feel free to experiment with offset values other than 30.)
Additional convenience methods: As we discussed, you must override all the methods in interfaces that you implement, but you can certainly add additional methods if you want. In the test harness below I've added shouldScan() and wasTracking() methods.
The Gun Class
Next, write a class called Gun that also implements the RobotPart interface. As before, you will need to override both of the interface's methods.
- In the override of the init() method, you will probably want to call setAdjustGunForRobotTurn(true).
- In the override of the move() method, you will want to aim the gun. Feel free to use the predictive targeting that I showed you last week.
The Tank Class
Lastly, write a class called Tank that also implements the RobotPart interface. If you haven't figured it out already, you will need to override both of the interface's methods in this class too.
- In the override of the init() method, you will probably want to call setColors(...) with colors of your choice. (See the online docs for Color for ideas.)
- In the override of the move() method, you will want to move your robot.
Test Harness
To test the various parts you wrote, you can start with the following skeleton code:
		public class PartsBot extends AdvancedRobot {

			private AdvancedEnemyBot enemy = new AdvancedEnemyBot();
			private Radar radar = new Radar();
			private Gun gun = new Gun();
			private Tank tank = new Tank();

			public void run() {

				RobotPart[] parts = new RobotPart[3];
				parts[0] = radar;
				parts[1] = gun;
				parts[2] = tank;

				// initialize each part
				for (int i = 0; i < parts.length; i++) {
					// behold, the magic of polymorphism
					parts[i].init();
				}

				// iterate through each part, moving them as we go
				for (int i = 0; true; i = (i + 1) % parts.length) {
					// polymorphism galore!
					parts[i].move();
					execute();
				}
			}

			public void onScannedRobot(ScannedRobotEvent e) {
				if (radar.shouldScan(e)) enemy.update(e, this);
			}

			public void onRobotDeath(RobotDeathEvent e) {
				if (radar.wasTracking(e)) enemy.reset();
			}

			...

			// put normalizeBearing and absoluteBearing methods here

			...

			// declare RobotPart interface and classes that implement it here
			// They will be _inner_ classes.

		}
I'll show you a demo that uses this test harness in class.
Note that you can use all the outer class' methods and variables inside the inner classes. Thus, you can make calls to setTurnRight() or setFire() without any qualifiers. You can also use the enemy variable in the inner classes as you normally would inside any of the outter class' methods.
Questions and Answers
-
How do I show you this lab working?
Using the above test harness, you can show me a robot zooming around the screen using all the parts you wrote.
-
What do you want me to turn in?
The PartsBot.java file with your name, the lab # and the course # at the top of the page in comments.
-
What's up with all those screwy .class files that were generated?
Glad you asked. This lab will illustrate how the Java compiler generates .class files for inner classes by concatenating the outer class name with the inner class name, putting a dollar sign ($) between them.
-
Will you pleeease show me the code for the shouldScan() and wasTracking() methods?
Oh, fine. Here:
		boolean shouldScan(ScannedRobotEvent e) {
			// track if we have no enemy, the one we found is significantly
			// closer, or we scanned the one we've been tracking.
			return (enemy.none() || e.getDistance() < enemy.getDistance() - 70 ||
					e.getName().equals(enemy.getName()));
		}

		boolean wasTracking(RobotDeathEvent e) {
			return (e.getName().equals(enemy.getName()));

		}
Downloaded (& re-formatted) from Mark Whitley originally at http://mark.random-article.com/weber/java/ch3/lab2.html